
Dutch bicycles require almost no maintenance. So the Dutch generally perform almost no maintenance on their bicycles themselves. But there is one thing that almost every Dutch child learns to do at a young age: how to fix a flat tyre!
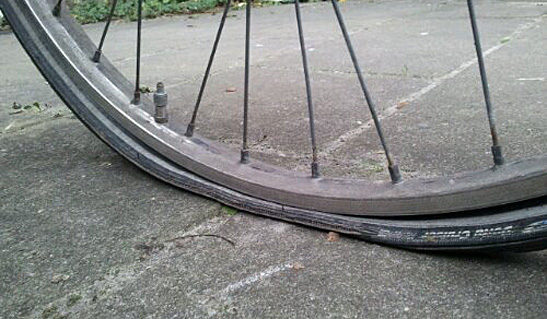
One of the many bicycle shops is of course happy to do the required maintenance on your bicycle, but repairing a puncture is considered so easy, that everyone should be able to do that. Dutch bicycle wheels, however, cannot be removed easily. Especially the rear wheel is difficult. I really haven’t a clue how it works exactly, but both the hub gear and the brakes are in there somehow. Never mind the enclosed chain case that would also be in the way. So how can we repair a flat tyre if we don’t even know how all that works? Easy: we don’t remove the wheel.

That makes the procedure very easy. The only tools you need fit in a very small repair box that virtually every Dutch family has in the house. They’re almost all the same brand too. Simson, type “Normaal” meaning standard or quite obviously ‘normal’. The box contains three tyre levers, a number of self-adhesive rubber patches, sand paper and tube solution (vulcanising glue). The box also contains valve rubber, but I wouldn’t know what to do with that. You don’t need it to repair a puncture and if I have trouble with a valve, I just buy a replacement valve. Much simpler. Lastly you will also need a pump.


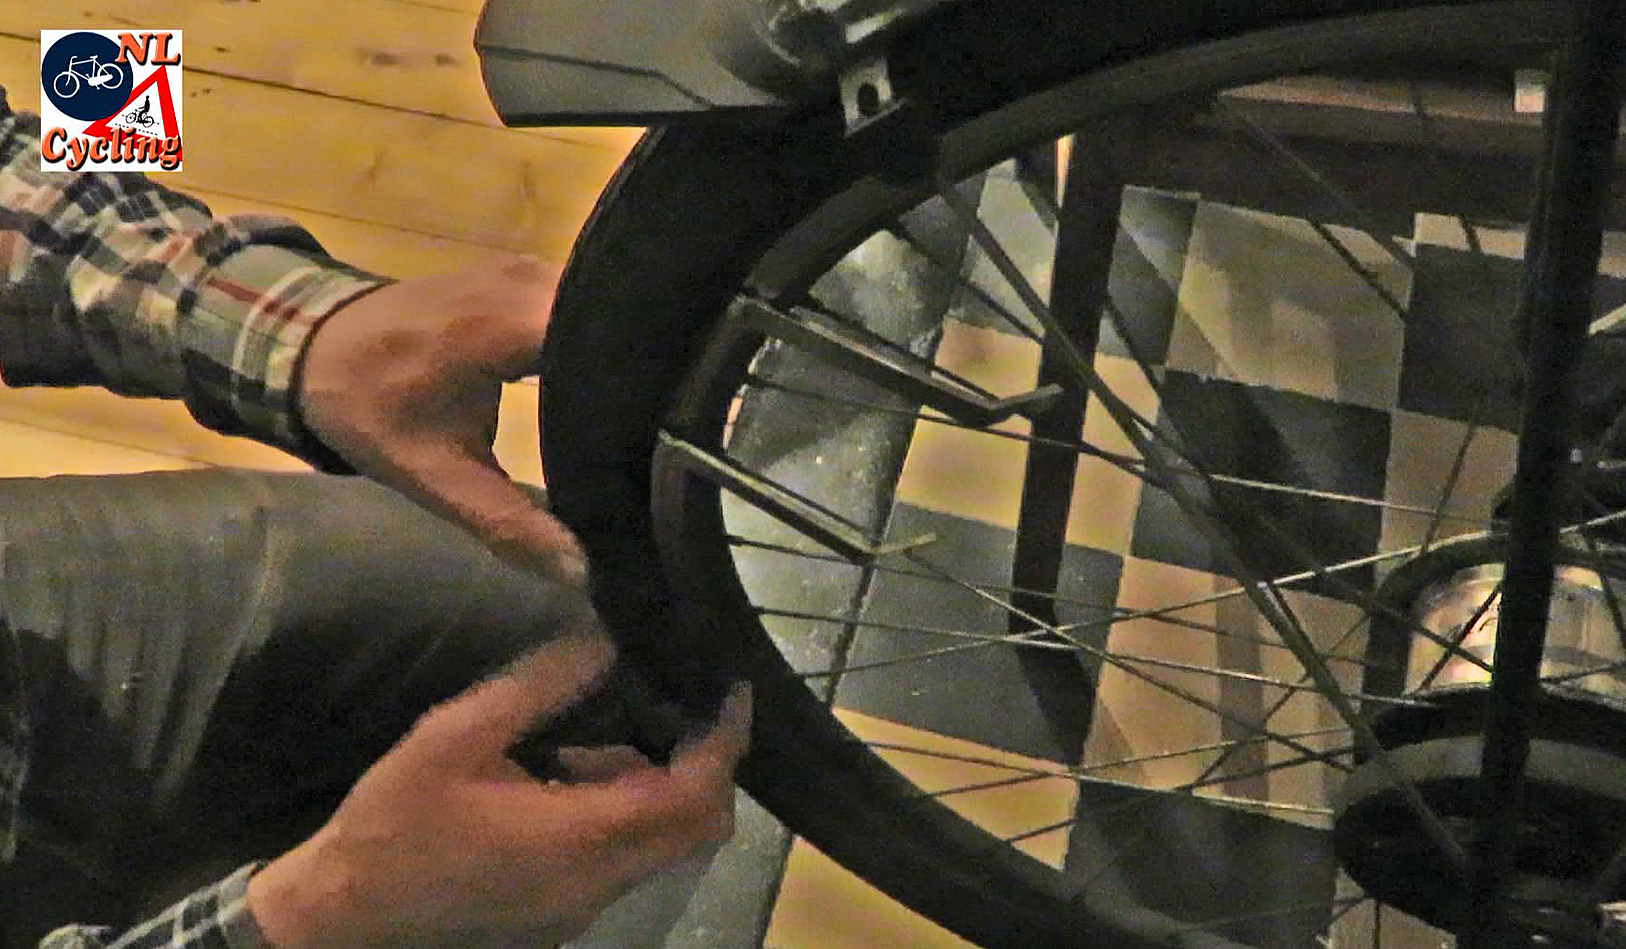
You start by turning your bicycle upside down. It can stand on the saddle and handle bars. Now you need to lift one side of the tyre off the rim. This is where the tyre levers come in. You wedge the lever between the tyre and rim and once it is placed, you attach the other end to the spokes. After the first one is in, you turn the wheel slightly and about 10 cm further you place another tyre lever. (A bit further if the tyre bead is very tight.) Repeat that for a third lever. The moment you place the third lever the second one usually drops and the rest of the lifting can be done by hand. Now that the tyre is open on one side you can reach for the tube. The valve needs to be taken apart, which really only means screwing off one ring. You can then push the valve stem (attached to the tube) through the rim and get most of the tube out in the open. It will remain locked in by the frame and the wheel axle, but you can now try to find the puncture.
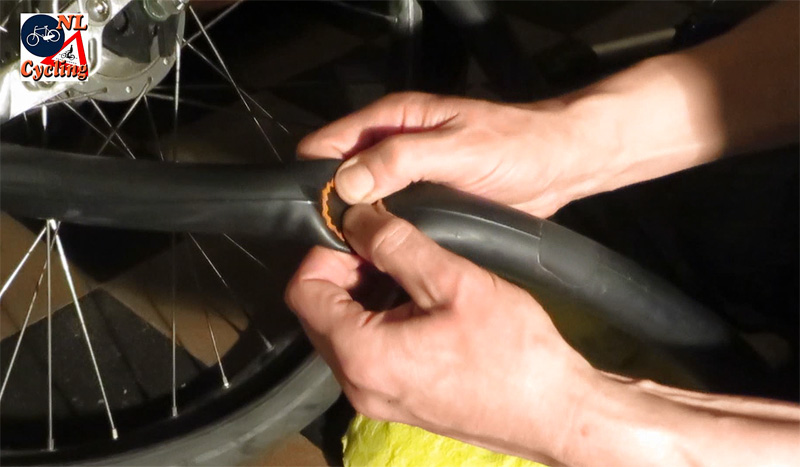
This is usually the hardest part of the whole exercise. You need to put some air in the tube. Not too much – the sharper parts of the bicycle might damage it where it is locked in – but just enough to find the puncture. If you are lucky you’ll hear the hissing sound of air escaping, but with smaller holes that will not happen. You will then need a bucket of water. Hold a part of the tube under water and see if you see bubbles. That would be the air escaping from the tube through the hole. You can only inspect a tiny bit of the tube in the bucket, so checking the whole thing may take a while. Sometimes you have to be right at the part of the tube that is still stuck in the bicycle. But like I said… this is the hardest part. Sooner or later you will see bubbles in the water and that’s when you found the hole! You need to mark it right away, so you dry the tube and mark the spot with a pen. Some people place a circle about the size of the patch. Others mark the exact location with an X. In any case, the marks have to be large, you need to use the sand paper to sand the tire and you don’t want to lose the entire mark after you’ve done that. I think the sanding is needed to clean the tube and also to make the glue stick to the rubber better. But I haven’t given it much thought really. I was just taught this is part of the procedure. After the sanding you need to apply a thin layer of the solution. The size of the glue should be larger than the patch you will use. The glue has to dry about 5 minutes. At least that is what they put in the manuals because most people will only wait about 3 minutes and that turns out to be just right. Then you place your patch in the glue on the tube right over the puncture and you push it firmly. Keep rubbing and pushing until you have the feeling it sticks just right, which is quite quickly normally.

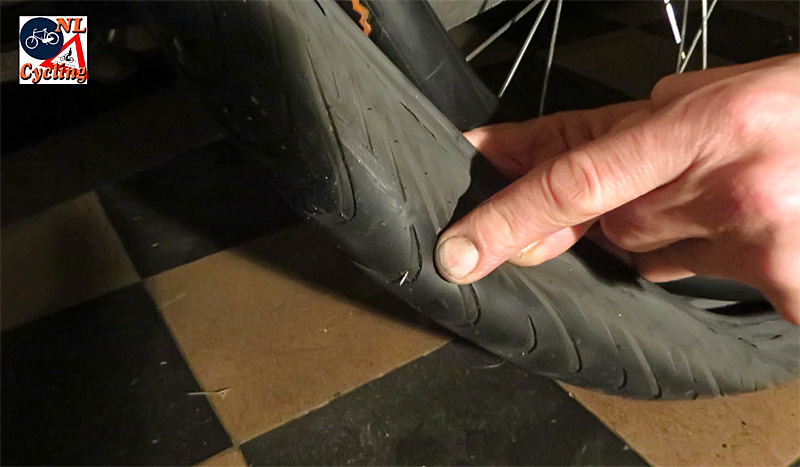
Before you put the tube back into the tyre you shouldn’t forget one important step in the procedure and that is checking the tyre for any sharp objects which caused the puncture. These things tend to stay in the tyre and that will obviously cause another puncture, which is the last thing we want. So use your fingers to feel if the inside of the tyre is completely smooth. Sometimes you will find something on the outside as well. A tiny fragment of glass or a piece of metal can already do the damage. It may sound strange but it is actually a great sensation if you do find something and you can remove it. That gives you the feeling that you really got rid of the cause of the flat tyre.
Now you need to get the tube back into the tyre. This has to be done carefully, you don’t want the tube to twist or turn and you need to be careful with the valve as well. You don’t want that too tight to the rim. Also be sure the rim strip stays in place. It works best with a bit of air in the tube. Once you got it all in you check if the tube isn’t trapped between the bead and the rim somewhere. If the tube sits nicely in the tyre you can pull the bead back on the rim. Most of the time this can be done by hand. Only sometimes you need the tyre lever to help you with the last bit. Especially when you have a new tyre this may happen. Update: Only use your hands to get the tyre back on the rim. Never the lever! I stand corrected! Now make sure the valve is also assembled well and then all you have to do is pump it up. You may want to check about halfway in to see if the tube is really seated well. Just spin the wheel slowly while you check for any irregularities. But usually it will all go great at this point. Now turn your bicycle upright again and you’re all done.
This week’s video shows the Dutch style puncture repair
That’s it, the easy Dutch way to repair a flat tyre!

Someone asked where you can get these patch kits.
Uhm, you can get them almost *everywhere* (at least in Europe), in dollar stores even. They usually come with 6-8 patches, glue, sand paper etc.
the 3 or 5 min. drying time is most important. The key is that all the organic solvents have to be gone, otherwise it will not hold. Blow on the glue layer..if it fogs it is still wet, wait until it is dry.. if you touch it on the edge in the extra area it should not feel tacky. Also spread glue nice and even no bumps or ridges.
What kind of tyres do you use? Mine get a flat after being left there for two weeks and every time we do go on a bike ride we have to pump up our tyres.
Hi! This was very helpful read. I am now motivated to repair the puncture myself.
Few questions though, how many self-adhesive patches are included in this box? And what is the best place to buy this repair box? Gamma?
Nice blog shared. One can also get the details of michelin tyres in pune only at Shree Tyres.
Hi, thanks for the post. Would be great if you could show how to change the chain on a dutch 8 speed Shimano with internal hubs. thank you.
This is a complete collection of over 200 videos and diy manuals covering the repair and maintenance of bicycles. It covers mountain bikes, road bikes and a section on racing bikes. http://dld.bz/howtorepairabicycle
Thanks. I just subscribed.
Alternatively, switch to Marathon Plus tires from Schwalbe. No more punctures 🙂
The patches in this vintage repair kit are modern, though. I recall that you used to get a rectangular sheet of rubber where you had to cut out your round patch. You had to carry a small pair of scissors then. The levers are still the indestructable metal ones. I’ve broken a few plastic levers through the years but still have my at least 35 year old Simson levers.
So, where’s today’s blog post? I’ve been waiting for 55 minutes or so. Does the Netherlands use Daylight Savings time?
Europe is not on daylight savings time yet. Post will be there in 2 minutes.
Great video, Mark. I learned this method recently and can see that it is half the work of taking the wheel completely off. I posted this on my blog so that others can enjoy your work. Thanks for posting.
On my last trip to Europe I was disappointed that I couldn’t seem to find a single souvenir that wasn’t in English. I finally found a souvenir in another language and that was a Simson repair kit. (I got the Aanvul.) It’s really nice.
I don’t fix many flats anymore and while I hadn’t really noticed at first a few years went by and I did notice. I think the difference compared to some years ago is that I now have Schwalbe tires. Also they’re doing much better maintenance on the streets so maybe there isn’t all the junk to ride over like there once was.
What surprised me when I first got to the Netherlands was that some bike shops aren’t even equipped to do any more than basic maintenance.
I took my bike in to get the back-pedal brakes repaired, and was surprised to come back in to find that rather than taking apart the hub and re-adjusting the brake, the mechanic had just found a similar-aged wheel with a working brake and switched out the whole wheel. He gave me the wheel for free and only charged me for about 15 minutes labour!
Bikes are so easy to maintain for the most part, especially Dutch single speeders with coaster brakes on the back wheel only, that the bicycle shops don’t need much equipment, simply using the good parts from otherwise broken bicycles will suffice for a large percentage of the necessary repairs beyond things like readjusting some chains or fixing a flat. A big advantage over car repair shops. It’s also something that almost anyone can learn to do as a tween.
One step I always did is to check that the patch actually fixed the leak and whether there is a second leak.
If you still have the bucket of water, re-check by submerging the fixed tube.
And as it turns out, cheap bikes in Australia seem to sometimes come without a rim strip and the rims are not necessarily cleaned properly after machining – so they can contain sharp aluminium curls. Argh!
Do mine eyes behold a previous patch on the tube? That brings back memories of my pre-Schwalbe days. I would get about one puncture a month (usually at the most inconvenient time making me late) and the inner tube would keep acquiring patches. This would continue until I would get a flat near a bike shop, which would repair it by replacing the inner tube with a new one. Then the new inner tube would start to acquire its own collection of patches!
I ride a Pashly Roadster Sovereign bike. It came with Schwalbe Marathon Plus tyres as factory standard equipment.
After I had been riding my new bike for a while, I noticed something: I never, ever got a puncture. Never a flat tyre. Ever.
That made a convert out of me. I will always use Schwalbe or other Kevlar tyres. Life is too short to have to deal with the aggravation of a flat.
I distinctly remember once having seven punctures in one week, somewhere in the eighties. The dispair. Now with those Schwalbe tyres, that’s over. Nearly completely.
With Dutch bikes changing a tyre is cumbersome, and you’ll need a fork spreader. Nowadays there are inner tubes that come with handy cut-off ends, so you’ll not need to take the whole wheel or one side of the wheel out of the rear fork. It just like a normal tube, except that it’s cut through and got the ends blocked up, so it’s more like a long narrow snake than a circle.
Very cool idea!
I also use Marathon Plus tires and these have greatly reduced my rate of punctures riding in Los Angeles. It’s the thickness of the tire/tube combination that reduces the odds of a puncture the most, not whether the tire has a tougher casing. If a glass or metal object gets stuck in the tire it will eventually works its way to the tube from the pounding that it gets every time the wheel rotates onto the road or path surface. This is explained on the Schwalbe website. The downside to the extra thickness in the Marathon Plus tires is that this creates a much stiffer tire that is a lot more difficult to remove from the rim and install.
I spent a couple of hours trying to install the 28 mm wide Marathon Plus with no success and ended up trying to find out what I was doing wrong by consulting the Schwalbe website. They mentioned that the 28 mm wide tire was extremely difficult to install and that its helpful to use a leather strap or zip tie to secure the part of the tire that you first installed onto the rim. If you don’t do that you’ll find the tire coming off on the part that you installed as you make your way around the rim.
Nice entry. I remember when I was riding on a rails-to-trails about ten miles from nowhere and I had a tiny sliver of glass in my tire. I couldn’t find it and every time I’d patch the tube I’d go a few hundred yards and then it would go flat again.
I used both spare tubes and an entire patch kit – was on my final patch when I finally felt the little glass sliver.
Thanks for sharing.
The best tip: Never, ever buy a Dutch bicycle. They suck big time. It is so much easier to fix a puncture when you can take the wheel out. I have been fixing my own bicycles since I was a boy and I really hate Dutch bicycles. I’ll never buy one again, not even for going out on saturday night. It’s 19th century technology. There is a reason why people bring their bikes to the shop for simple things like this. The list of design flaws that make maintenance hard is virtually endless. Dutchies treat their bicycles as disposables, bike mechanics love working on sport bicycles but hate working on Dutch bikes.
I’m sorry, but you are gold plating a turd here.
Ultimately, it depends on what you’re trying to get out of a particular bicycle and what level of maintenance one is willing to perform. As someone who owns and uses a Dutch bicycle, a hybrid and a road bike, I’m well aware of the differences in each. For commuting and shopping, the Dutch bike is hands down the most convenient. Keeps me and itself clean and is best equipped to carry stuff. There’s a reason why this “19th century technology” is still around: it works well for that. There’s no need to fix what isn’t broken or improve on something that is already very optimally designed for specific tasks. Obviously I wouldn’t use a Dutch bicycle to go mountain biking, long-distance touring or even bumpy off-road riding. That’s why I have other types of bicycles. True, it’s more of a hassle to maintain a Dutch bike, but it hardly requires any maintenance to begin with. I’ve had my oma for 4 years now, and the only thing I’ve ever need to do was fix a flat, the way Mark mentioned here. And that was because I neglected to pump the tire for a couple of months and the pressure fell well below the minimum recommended by the tire. For the other things, like the internal brakes, gears and other higher-tech components, that would be for the bike shop because I have no desire to be an expert bike mechanic. The only extra thing I’ll maintain myself on the other two bikes are the rim brake pads. These are both great for recreational riding. But for commuting, they require a lot more maintenance.
A modern bicycle can be fitted out with racks and fenders too. Actually, I do own one, for riding to the shop and the bar. It works way better for that than the Dutch style city bike. I’ve had flats on both. I’ve had troubles with the brakes of both, but on only one it was easy to fix, guess which one. On the Dutch bike, which I hardly use, spokes break, the fenders rot away because they are steel in a country with salt on the roads every winter, the chain is rusting because it is too much of a hassle to keep it lubricated and the 3-speed SA never shifts well. Oh, and the generator is on the front wheel so the lights system last maybe a few weeks of city biking.
The Dutchies don’t maintain their bicycles because it is just too hard. They throw it away after a few years and buy a new one.
I don’t know how you handle your bike Walter, but mine is still in tiptop shape after 15 years or so. Sometimes I look jealously at new, hip bikes, but I just don’t have a good enough reason to ditch my old bike and buy a new one. It’s simply too good to throw away.
My Simplex is still going strong after 50 years. No gears, kick-back brake, indestructible. Once a lycra-clad speedster on a carbon fibre bike did not give way and we crashed into one another. His bike was roadkill, I rode home as if nothing had happened.
I had to do just that with my hybrid because things like racks and fenders aren’t standard accessories. It’s usable as a commuter bike, but still has several shortfalls. The exposed brakes lose considerable power in the rain, the chain gets dirty easily and I have to tie up my pants to avoid it getting caught or mucked up. Another thing I didn’t mention is the built-in dynamo lights, which is way more convenient than dealing with removable ones with batteries. I had a 5-speed SA in the past and my 8-speed Shimano Nexus is definitely much better. Obviously, not all Dutch bikes are built the same. Mine has extra thick ss spokes, double-walled rims and powder-coated frame and fenders. So no rust even though it sits outside 365 in Florida, where there’s lots of rain and also salt from the sea breeze.
What would be interesting to this conversation is to get the Danish perspective. They also have a very cycle-friendly country but the traditional ‘Dutch’ bike is considerably less ubiquitous there. Most bikes in Cph looked more like my hybrid, but the big difference is that they typically still have internal brakes and gears and at least a partial chaincase. Some even have dynamo lights as well. From what my Danish friends tell me, they also try and fix flats without removing the wheels, because even without a full chaincase, it’s still lot more tedious than a quick-release system.
My bicycles have never needed maintenance in their 5-10 year lifespan, aside from a loose chain one of the dozen or so bicycle repair guys will tighten in a sec for a smile. After 5-10 years they simply got stolen and I just bought a new one.
I was, however, taught how to repair a flat tire at 7 years old and could still do it if need be.
Have you looked at a bicycle catalogue like Gazelle lately Walter? Plenty of ‘Dutch’ bikes with quick release wheels and derailleur gear set ups.
Why do you need a bucket of water? Isn’t there a law in the Netherlands that says that a canal must be located within a bicycle’s width away from every person at all times?
That law only applies when there is a diver within 25 meters.
I’ve only fixed one flat in my life, and I had help, but I used the talc from the repair kit to find the leak. It makes a nice cloud when puffed!
I used to do all the repairs on my bikes from about age 11, but now the gears and other stuff have become so complicated that on my last three bikes it was impossible to do any serious repairs other than your accurately described (apart from haayman’s excellent remarks) tyre fixing. I was really angry when I found out I needed special tools just to calibrate the gears. With the old Sturmey Archer three gear hubs I just needed to set nr 3 just a tiny bit tight and then everyting would work. Not so with Shimano 7- or 8-geared hubs. So yes, now I go to the repair shop a lot more often than I used to. And I somehow never managed to get my kids and wife to do their own small repairs, haha. Dad to the rescue.
More complicated bikes has inspired some to think of simple solutions. I think this is brilliant: the open-ended tube! https://www.consumentenbond.nl/elektrische-fietsen/gaadi-binnenband/?pageSize=20
I can adjust my Shimano Nexus 8 without tools, just by turning the barrel adjuster and looking for the indexing marks marks in 4th gear. What tools do you need?
My old bike didn’t, and I have not yet gotten to that with my new bike. Glad to hear they fixed that, it was ridiculous.
Never thought I could teach you anything about bikes Mark, but I’ve got 2 remarks about this:
– before resorting to water it’s easier to first try to use your lips to find the leak (especially when you’re outside). Keep your lips close to the tire and go all the way around. Lips are very sensitive to feel the flow of air.
– NEVER use a lever to put back the tire, since you easily will create another leak. If you can’t get the tire back it’s because it doesn’t fit nicely in the rim at the opposite side. Fix that and use the heel of your hand to force the tire back.
My 2 cents
Oh I’m sure you could teach me a whole lot about bikes. I don’t have much knowledge about the workings of the machine. I will pass your remark about never to use levers for the reverse action to my tutor: my dad. 🙂 I must say, I haven’t done that in a while indeed. Maybe that was only to compensate the lack of force in my hands as a child.
Weren’t 1 cent coins phased out in the Netherlands (two cents pun)?
To make the tyre sit nicely in the rim, start on the opposite side of the wheel, pinch the tyre and ‘stretch’ it towards the bit that is not on the rim yet. Do this in two directions and you will have created enough slack for the last bit of the tyre to go back easily. This is what I learned from my dad after managing to create another ten (10!) punctures by using a lever to get the tyre back on…
Yes! I thought I was the only one who knew the trick with the lips. It definitely works.
I always have to use levers to get the tyres back on. It’s fine as long as you’re careful not to stab the inner tube or trap the tube between tyre and rim.
And remember kids, if the cat doesn’t approve, it’ll claw up the tyre.
No it wouldn’t! My cat is way too sweet! 🙂
Now what makes me think that you got a flat last week? I never learned how to repair a flat.
Also, David (Hembrow) told me on the phone a few days ago that the best thing the Dutch are good at is riding in a straight line, even while doing things like texting on a phone, and really bad at maintenance on their bicycles.
And the Dutch repairing and interacting with their own bicycles is like how most people think of their car. They often have no idea how it works, they just know that you need to push down on the right pedal to go forward, left pedal to stop (or middle pedal in a manual transmission car), and if equipped, the leftmost pedal to change gears, turn the steering wheel to go, and a few other buttons. They may know how to add fluids to the engine, but few ever know or even care about how the engine, the catalytic converter, the suspension, whatever, works.
The Dutch probably have no idea how a hub gear works (except for bike mechanics), or how their brakes work if they are enclosed. They just know that turning the bicycle handlebars makes it go in that direction, pushing down on the pedals forward makes the bike go forward, pulling the lever(s) if equipped on the handlebar back makes the bike stop or slow, same with backpedaling a coaster brake bike, and you get my point.
Very valuable video. All of my tire-repair stuff fits into a small bag that fits in one of the bottle cages. My bicycles never leave home without it. Otherwise, you’re guaranteed to have a flat. 🙂
Instead of a hand pump, I have a tiny CO2 pump and two CO2 bottles. Redundancy. Much faster. And smaller.
I am able to remove the wheel, so I carry a spare tube in the bag. Faster repair again and I’ve found that patches I apply tend to start leaking afterwhile.
Our local Trek bike shop occasionally has classes on this kind of thing. It’s not bad to actually do a hands-on tire repair. When you eventually have a flat, it reduces the level of panic, knowing that you’ve done it before.
I brought a true “Samson normaal” repair box with me to Brazil 😉 Definitely cheaper/better than what can be bought here.
And indeed: check the tire for the object that puctured it: I once learned that the hard way, by patching my tire three times because I forgot to check the first two times.
No, no, no, Mark. The true Dutch way to fix a flat tyre is to wait till nobody is looking, then wheel the bike to the nearest bike shop – never more than a 20-minute walk in NL!
Hush! That’s the pro-tip! 🙂
If you’re waiting for everyone not to be looking, you’d be waiting a while. Either another cyclist or the NSA (US) is always looking.
Wow, this takes me back to the ’80s when I lived in Nijmegen. I was always changing flat tires!
While I have 3 Gazelle bikes here in Los Angeles and I own a few Simson repair kits, I have yet to change a flat here. This video has inspired me to give it a shot next time I get a flat.
Yep, that is exactly how I learned it at home as a kid. With the stuff in the same Simson box.